Cisco TRex Packet Generator - Step by Step
Opinions are my own and not the views of my employer nor do I represent my employer in any way.

The Cisco TRex Realistic Traffic Generator is open-source, free software that allows a user to send real-world traffic through a device for testing the device's load capabilities or other device features.
In this article, I will endeavor to explain my understanding of the basic concepts of the TRex Realistic Traffic Generator (we will just call it "trex" from here on), as well as the steps required to use trex to test a Cisco Secure Firewall's capabilities.
Requirements
Most Linux distros should work for this, but in my lab I am using Ubuntu 22.04 Server (Jammy Jam) that is a KVM virtual machine running as part of my eve-ng server.
A device with 3 ethernet interfaces. In my lab, I am using a KVM Ubuntu host using the
virtio-net-pcidriver for the 3 ethernet interfaces. See "Table 5. Supported NICs" in the trex documentation for bare-metal or VMware/VirtualBox supported network interface cards/virtual nics.
Networking
Of the (3) interfaces, trex will dynamically configure (2) ethernet interfaces for generated traffic. One interface will generate or emit the traffic, simulating the client side of connections, while the other interface will receive the traffic and respond to the client connection requests as though it were hosting a number of servers or services behind that network interface.
As mentioned, there are (3) interfaces.
Management interface - The Ubuntu hosts's IP address, used to ssh to the Ubuntu server. This is your typical Ubuntu Linux interface configured under
/etc/netplan/*.yamlTrex interfaces - The (2) interfaces used to emit and receive traffic from the trex packet generator software. We will not configure these interfaces in Ubuntu. That is, there are no netplan configuration files for these interfaces.
Planning the Trex Interfaces
The trex interface IP and gateway addresses will map to the IP subnets and interfaces of the device under test (DUT).
For example, I have a Cisco Secure Firewall Threat Defense (FTD) appliance that I will be testing.
The inside network of the FTD is
192.168.130.0/24The outside network of the FTD is
192.168.47.16/28
Since I want the trex traffic to flow from the FTD's inside interface to the FTD's outside interface, and then have the return traffic come directly back through the FTD's outside interface, we will bypass the rest of the network infrastructure by declaring the gateway of the "server" interface of the trex server to be the outside interface of the FTD. This all sounds more complicated than it actually is. I like to say "show don't tell":

| Interface | IP Address | Gateway | DUT - FTD Segment |
| Eth1 | 192.168.130.5 | 192.168.130.1 | inside |
| Eth2 | 192.168.47.19 | 192.168.47.18 | outside |
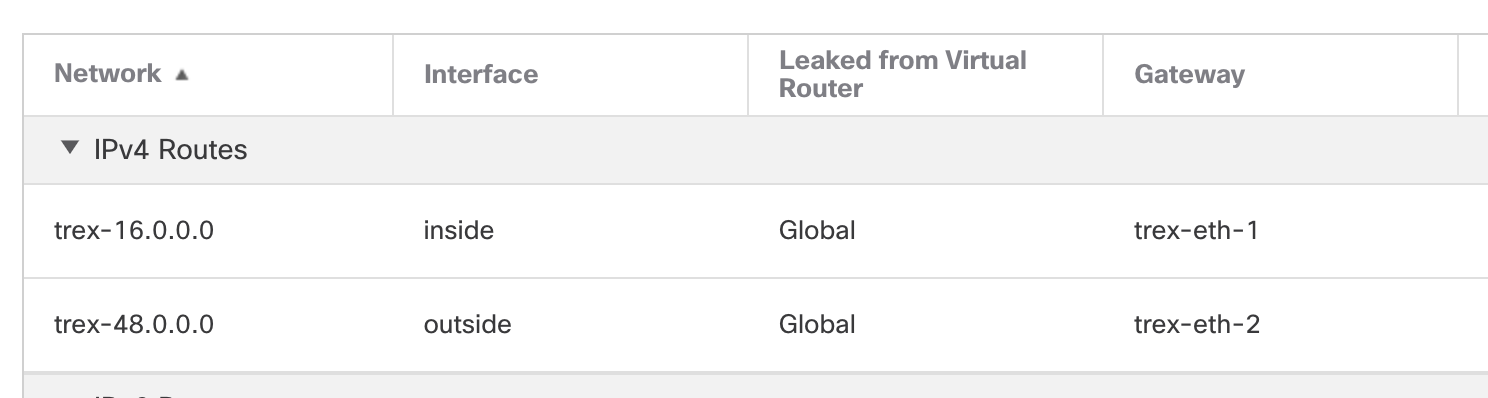
Configure the DUT Static Routes
Now here is where things get a little abstract. The clients and servers that trex dynamically simulates live in a different IP subnet than the actual inside and outside IP subnets. What this effectively means is that trex will act like a router with the servers and clients sitting behind it. So, we will need to let the FTD know the next-hop ip addresses to reach these foreign subnets that exist behind this router (trex). Again this sounds more complicated than it actually is.
| Trex Interface | Subnet | Next-Hop | FTD Segment |
| Eth1 | 16.0.0.0/16 | 192.168.130.5 | inside |
| Eth2 | 48.0.0.0/16 | 192.168.47.19 | outside |
In the above table, 16.0.0.0/16 will be the "client" IP subnet behind the trex "router" and 48.0.0.0/16 will be the "server" IP subnet behind the trex "router".
The static routes that we will put on our FTD come directly from the table above
route inside 16.0.0.0 255.255.0.0 192.168.130.5
route outside 48.0.0.0 255.255.0.0 192.168.47.19
Open FMC/cdFMC and add the above static routes to your FTD device under test and deploy the configuration to the FTD.
Complete Networking Diagram

Install and Configure Trex
Install the latest release of trex on your Linux system
Download the latest trex distro https://trex-tgn.cisco.com/trex/release/
 sudo mkdir -p /opt/trex
 cd /opt/trex
 sudo wget --no-cache https://trex-tgn.cisco.com/trex/release/latest
 sudo tar -xzvf latest
 sudo rm latest
Verify that trex can see the needed interfaces using the
dpdk_setup_ports.pyscriptcd /opt/trex/v3.04/ sudo ./dpdk_setup_ports.py -t +----+------+---------+-------------------+-----------------------+------------+----------+----------+ | ID | NUMA | PCI | MAC | Name | Driver | Linux IF | Active | +====+======+=========+===================+=======================+============+==========+==========+ | 0 | -1 | 00:03.0 | 50:00:00:0c:00:00 | Virtio network device | virtio-pci | ens3 | *Active* | +----+------+---------+-------------------+-----------------------+------------+----------+----------+ | 1 | -1 | 00:04.0 | 50:00:00:0c:00:01 | Virtio network device | virtio-pci | ens4 | | +----+------+---------+-------------------+-----------------------+------------+----------+----------+ | 2 | -1 | 00:05.0 | 50:00:00:0c:00:02 | Virtio network device | virtio-pci | ens5 | | +----+------+---------+-------------------+-----------------------+------------+----------+----------+In the output we should see all 3 interface. The management interface, which we will ignore and then the other two interfaces. The interface PCI identifiers are:
00:03.0 - eth0/ens3 !!Warning!! Don't use this one, it's our management interface!
00:04.0 - eth1/ens4
00:05.0 - eth2/ens5
Create a skeleton /etc/trex_cfg.yaml using the dpdk_setup_ports.py script interactive mode:
cd /opt/trex/v3.04/
sudo ./dpdk_setup_ports.py -i
Enter
Nfor theMAC based configquestionEnter
1 2for the interface numbers (Based on the interface output)Change the IP Address and gateway details from the previous section "Planning the Trex Interfaces"
Interface 1:192.168.130.5and192.168.130.1
Interface 2:192.168.47.19and192.168.47.18Review the configuration and let the script write the config to the default location:
/etc/trex_cfg.yaml
### Config file generated by dpdk_setup_ports.py ###

- version: 2
  interfaces: ['00:04.0', '00:05.0']
  port_info:
      - ip: 192.168.130.5
        default_gw: 192.168.130.1
      - ip: 192.168.47.19
        default_gw: 192.168.47.18

  platform:
      master_thread_id: 0
      latency_thread_id: 1
      dual_if:
        - socket: 0
          threads: [2,3]
Run your first test
Note: If you are testing a security device like I am with the Cisco Secure Firewall Thread Defense appliance, obviously the FTD "inside to outside" access-control security policy will need to be modified to allow traffic from the trex subnets allowing 16.0.0.0 255.255.0.0 to 48.0.0.0 255.255.0.0 We will also want to bypass any catch-all NAT/PAT policies, etc. This is beyond the scope of this article, but should be familiar to FTD adminstrators.
Trex comes with a boatload of packet captures and traffic profiles that we can take advantage of right away. These sample captures and traffic profiles can be found in the trex directory under the cap2 directory.
We will use the cap2/http_simple.yaml profile and associated captures to run our first traffic load across the DUT.
cd /opt/trex/v3.04/
sudo ./t-rex-64 -f cap2/http_simple.yaml -d 30 -m 1 -c 1 -k 5 --nc
When the script starts up, it will assign the configured IP addresses to ethernet 1 and 2 and then will attempt to gratuitous ARP for the configured gateway IP addresses.
If your security and NAT policies allow the traffic, you will see the port0 (eth1) and port1 (eth2) interface counters incrementing.
-Per port stats table
      ports |               0 |               1
 -----------------------------------------------------------------------------------------
   opackets |             998 |            1636
     obytes |           81368 |         2376914
   ipackets |            1564 |             147
     ibytes |         2372306 |            8766
    ierrors |               0 |               0
    oerrors |               0 |               0
      Tx Bw |      25.71 Kbps |     759.60 Kbps
That's it, your traffic is flowing! A CTRL-C will stop your test and give you a summary of the test results.
-Global stats enabled
 Cpu Utilization : 0.4  %  0.4 Gb/core
 Platform_factor : 1.0
 Total-Tx        :     785.31 Kbps
 Total-Rx        :     760.87 Kbps
 Total-PPS       :     104.90  pps
 Total-CPS       :       2.79  cps

 Expected-PPS    :     102.71  pps
 Expected-CPS    :       2.78  cps
 Expected-BPS    :     767.80 Kbps

 Active-flows    :        1  Clients :      255   Socket-util : 0.0000 %
 Open-flows      :       72  Servers :    65535   Socket :        1 Socket/Clients :  0.0
 drop-rate       :       0.00  bps
 current time    : 27.4 sec
 test duration   : 2.6 sec
 *** TRex is shutting down - cause: 'CTRL + C detected'
Tips and Tricks
Make sure your DUT allows the traffic - For ASA and FTD packet-tracer can help verify this.
Check your DUT routing tables for static route accuracy
Make sure the gateway IP addresses are correct in your
/etc/trex_cfg.yamlconfiguration file.While the 16.0.0.0 and 48.0.0.0 networks are the defaults in the traffic profiles, these can be changed in the profile yaml to suite your needs.
Update 8/4/2025
I was able to get Trex to run on an Ubuntu 24.04 with recent apt updates. It’s a bit tricky, but see my comment in this issue to get the gist of what one currently needs to do to run Trex on an updated Linux kernal/system.